Picture Framing - the basics. Part 4
Posted on
Picture Framing - by Anne Kerr
Part 4: Final Assembly
In the first three parts of this series on picture framing we have looked at cutting picture mounts, making bespoke frames and cutting glass. We can now look at assembling all the components. We will also look at framing artwork that does not require glass.
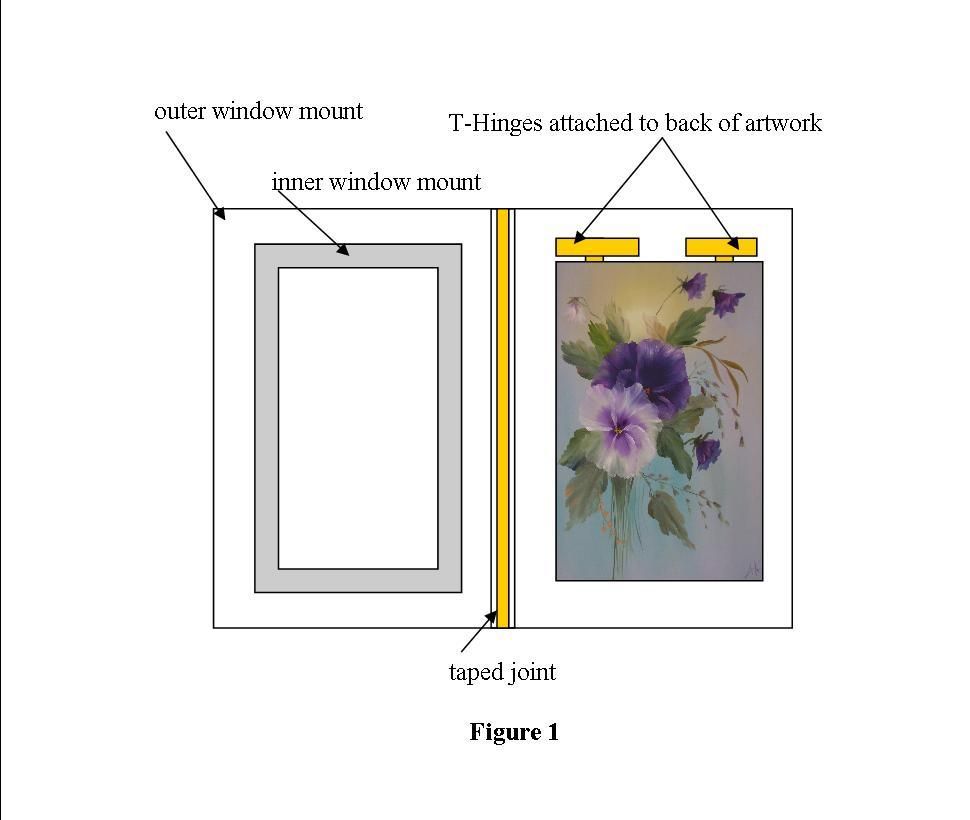
Your piece of artwork could be attached to the back of the bevelled mount, but the ideal way is to make a 'mount package'. A mount package is rather like a sandwich. The bevel cut mount on the top, the artwork in the middle and an undermount at the bottom. We have already seen that any materials that touch the artwork should be pH neutral. This means that the materials have been treated to reduce the amount of acid present. All good quality picture framing materials should be pH neutral. When putting your 'mount package' together, the artwork will be attached to the undermount. This can be done in many ways; the best way is to use 'T-Hinges'. A T-Hinge consists of a piece of framer's tape, part attached to the back of the upper edge of the artwork. This in turn is held in place on the undermount by a longer overlapping strip forming a T- shape. (see figure 1)
How to make a T-Hinge Mount Package
- Cut an undermount (a piece of mountboard will be ideal) the same dimensions as the bevelled window mount.
- Place the bevelled window mount face down alongside the cut undermount. Leave a slight gap between the boards (thickness of the mountboard). Use a length of framer's white tape to join the two boards.
- Place the artwork on the undermount, inside the hinge mount package. Move the artwork around to find the desired position by looking through the bevelled window mount. Put a small weight on the artwork to keep it in place and using a pencil, mark the undermount around the two top corners of the artwork.
- Turn your artwork facedown on a clean surface. Tear off two small tabs of framer's white tape. Attach the bottom section of each tab to the top edge of the back of the artwork.
- Turn the artwork back the right way and position it on the pencil marks you made on the undermount
- Tear off two more strips of framer's white tape and apply these across the tabs to form a T-shape. Your artwork is now securely fixed to the undermount and should be seen perfectly through the bevelled mount when you close it up.
Tip....If you tear your tape you have a softer edge than if you cut it. This softer edge is less visible behind your artwork.
The idea of the hinge joint is to allow the artwork to hang freely within the mount package.
Many people make the mistake of fixing artwork on all four sides. Paper materials will absorb water from the atmosphere; so if the material can't move it will buckle as atmospheric conditions change.
The last item we need for our framing project is a back board. The choice of materials for back boards usually comes down to price. The material should be fairly rigid and approximately 2mm thick. Most picture framing suppliers will sell special back board sheets that are very economical and can be easily cut with a craft knife or your mount cutter. Alternatively you could use MDF, hardboard or foam core.
Putting it all together
It's a good idea to have an off-cut of carpet on your workbench or table to protect the surface of your picture frame.
- Clean both sides of your glass with spray-on glass cleaner and a lint free cloth. (take care when handling glass, wearing gloves is advisable).
- Place the frame face down on the workbench/table. Lay the glass carefully into the frame.
- Check for dust, especially in the corners.
- Check for dust or marks on the mount package, then place the package face down on the glass.
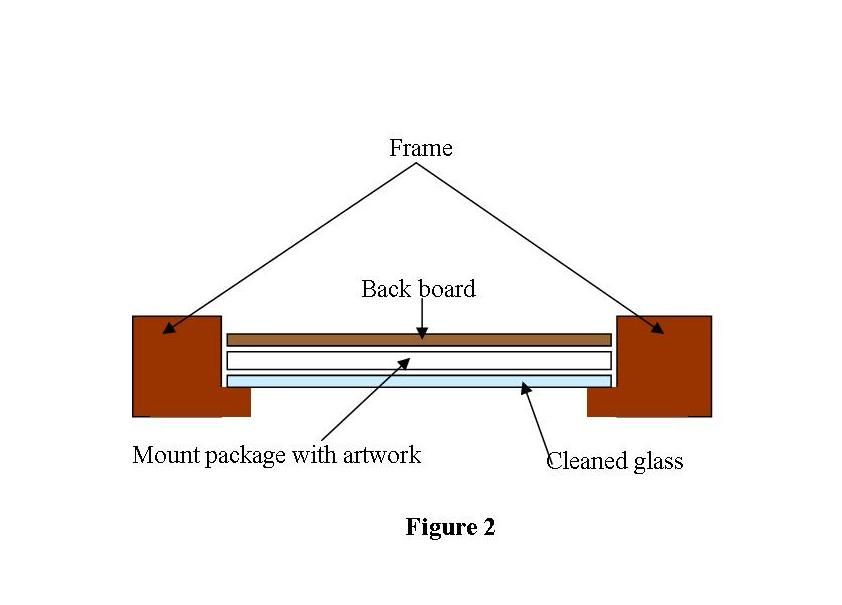
- Place the backboard on the mount package (see figure 2)
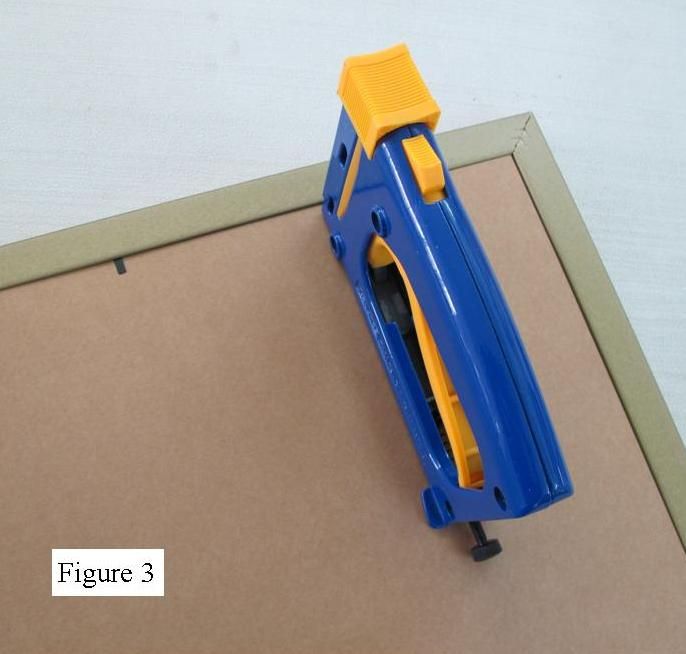
- Use the tab gun, to fit rigid points into the back of the moulding. Rest the gun on the surface of the back board, butt the head of the gun against the moulding and pull the trigger upwards (see figure 3).
- Insert one tab into the middle of each side. Turn the framed picture over to check once more for any marks or dust before inserting the remaining tabs into the back of the frame.
- Stick brown self-adhesive framer's tape, along each side covering the join between the back board and the frame. There will probably be a drop from the edge of the frame to the surface of the back board. If so, cut the tape at each end and push it down, sticking it to the back board (see figure 4).
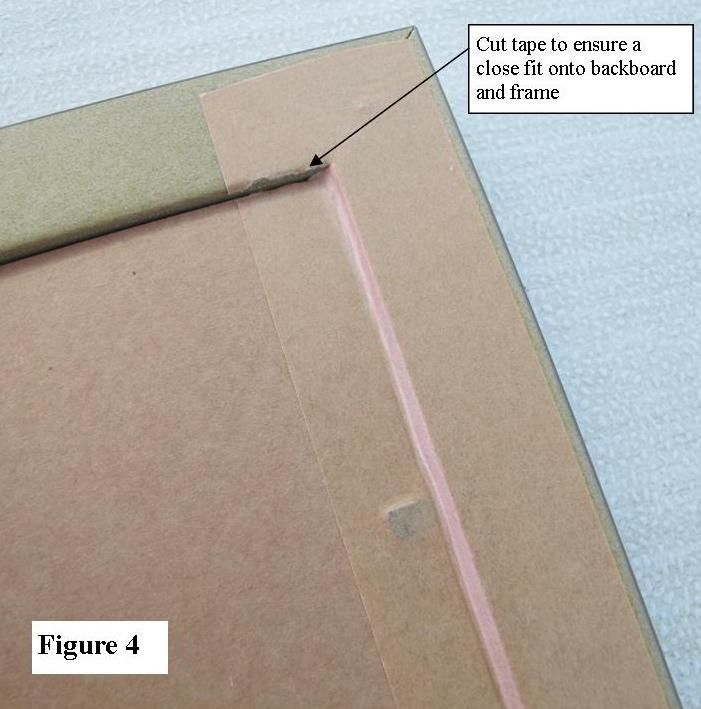
- Always make sure there are no 'bridges' of tape across your corners. This is where air will be trapped and the tape will eventually start to lift away from the frame and back board.
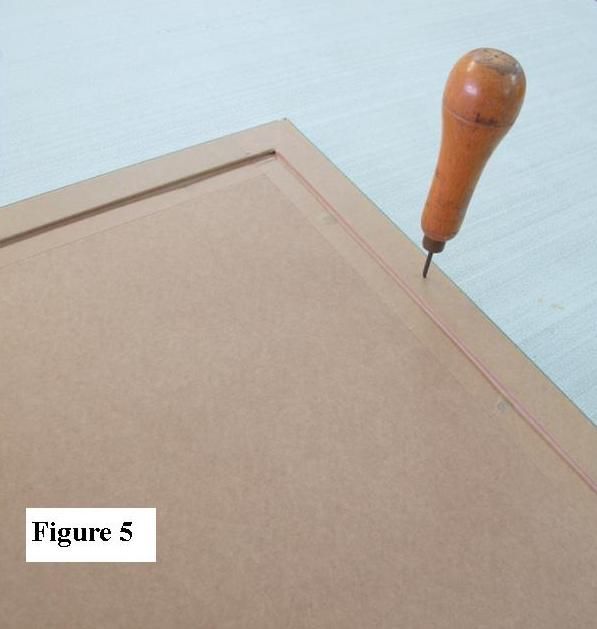
- Use a bradawl to start holes in the back of the frame about 1/3rd of the total frame height (from the top) on each side. (see figure 5)
- Use a screwdriver to fix D-rings, into each of the holes with a screw.
Tip....Before using your screws, always check that they are not too long or they will break through the front surface of your frame. (don't ask me how I know this!)
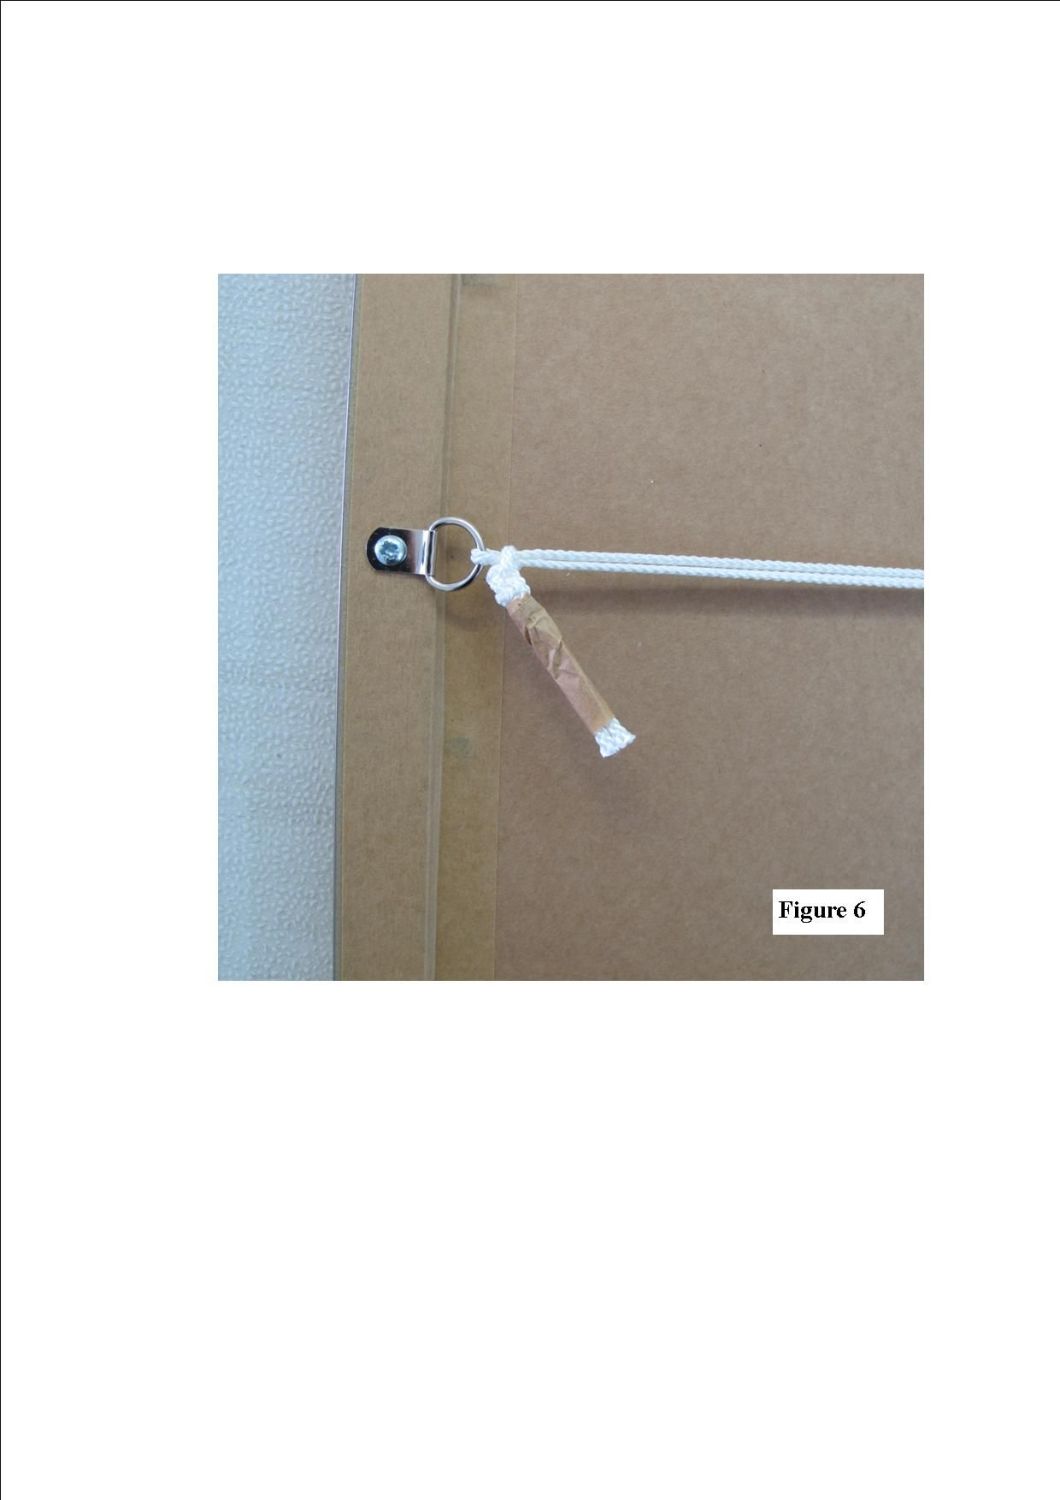
- Cut and fasten a double length or cord tightly to the D-Rings. Ensure that however you tie the cord it is taught, secure and will not unravel.
- To make a really professional look to your finished framed picture, take a small piece of framer's brown tape and wind this around the loose ends of the cord (see figure 6).
- If you have some little self adhesive felt pads, put one of these on the bottom two corners of the frame. These not only prevent the frame from scratching the wall but also allow air to circulate around the picture. Especially useful in hot conditions to help prevent condensation forming.
Figure 7 shows you the back view of a framed picture with all the component parts labelled.
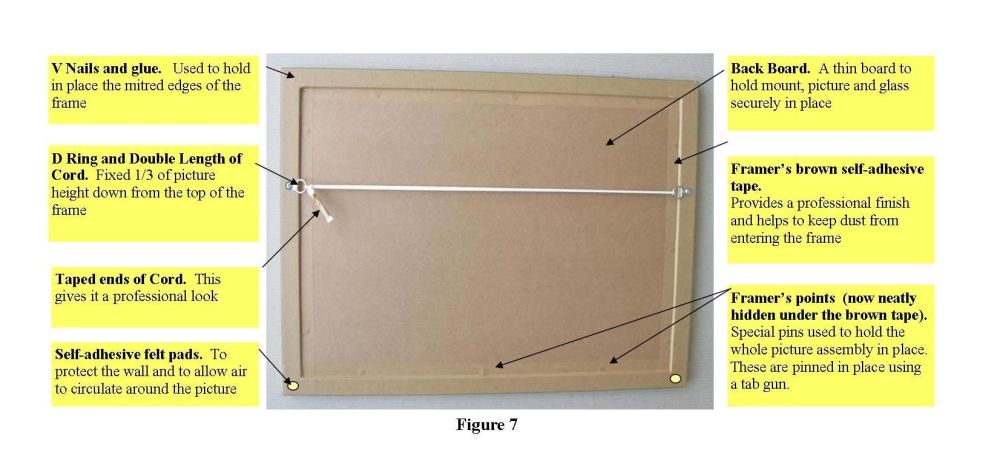
Congratulations! Your picture is now ready for hanging.
Artwork that does not need glass
Some artwork, for example oil paintings, do not require framing behind glass. They will only need a frame and some means of attaching the frame to the artwork.
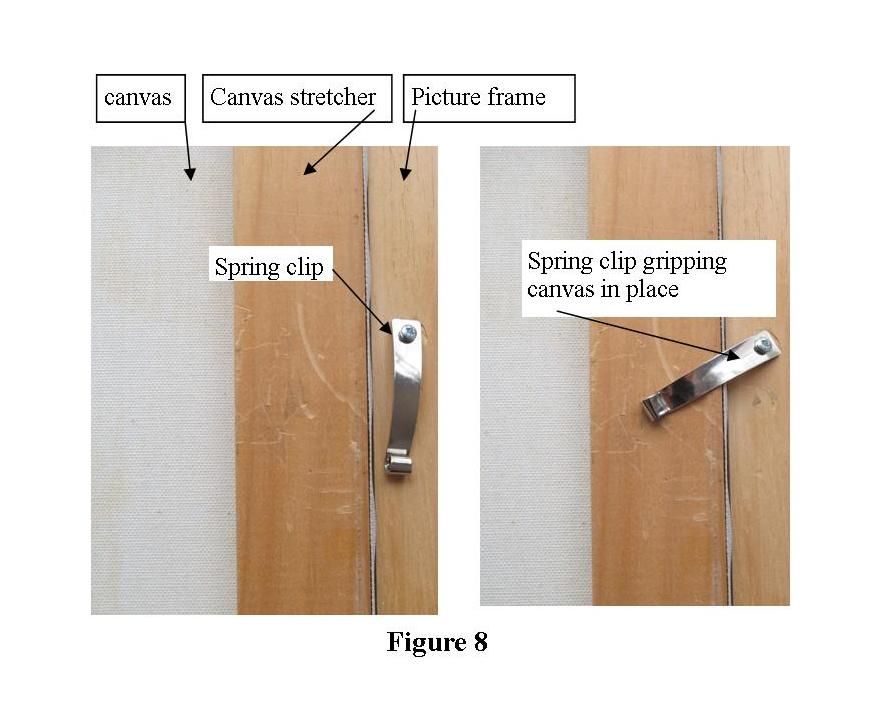
If your painting is on a stretched canvas, make your picture frame to fit your canvas and attach the canvas to the frame. There are several ways of doing this. One way is to use four little spring clips that are screwed to the back of the frame and lifted onto the canvas to hold it in place (see figure 8)
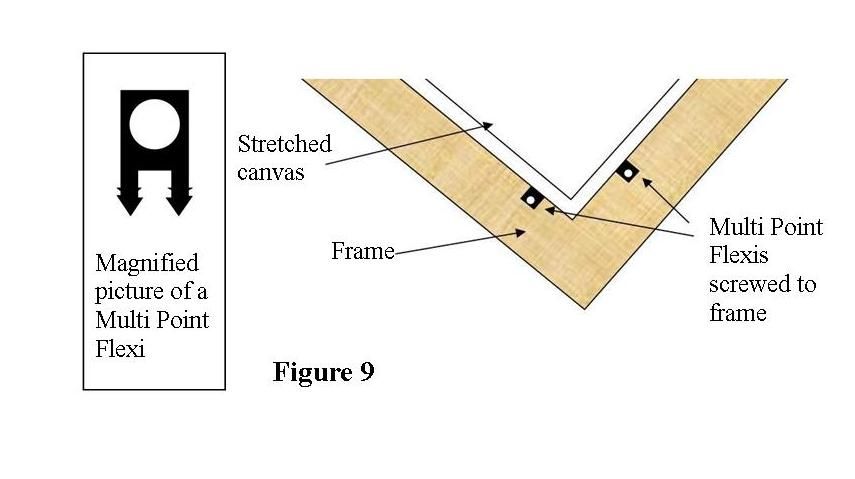
Another method of attaching a canvas is with little 'Multi Point Flexis' fired from a Multi Flexi gun, then screwed to the frame. These little Flexis are only about 15mm long and very neat when in place. (see figure 9). The 'Fletcher Multi Master' is a good example of this little tool and can be purchased from most framing suppliers.
If your artwork has been painted on a board, first make a frame to fit the board. Place your artwork in the frame, cut a piece of backing board and place it behind your artwork. Fix everything with tabs and framer's tape the same way you did for the frame with glass.
In the final part of this series, we will look at storage of your framing materials and how to accurately price a picture framing job.
